Šiame straipsnyje
- Quick answer
- Understand polarity without confusing it with phase
- Make the system safe to inspect
- Trace one conductor all the way through
- Inspect terminations as well as colors
- Use a listening check as supporting evidence
- Understand why reversing both speakers is different
- Check bi-wire terminals and special layouts
- Document the correction and investigate remaining symptoms
- Sources
Quick answer
Switch the amplifier off before touching speaker wiring. Trace each cable conductor from the amplifier's positive terminal to the speaker's positive terminal, and negative to negative. Use the cable's stripe, printing, ridge, or color marking consistently at both ends. The marking identifies a conductor; it does not carry an inherent positive or negative identity.
If one speaker is reversed relative to the other, centered voices may become diffuse and shared bass may weaken at some listening positions. Correct the wiring visually rather than relying only on a listening test. Do not use wall power, improvised battery tests, or live cable swapping to determine polarity.
Understand polarity without confusing it with phase
Polarity describes the electrical orientation of the connection. Reversing both conductors on one speaker reverses that speaker's signal relative to the other. Phase relationships also depend on frequency, speaker design, distance, and room reflections, so not every hollow sound or bass dip means the cable is reversed.
The practical goal is consistent wiring according to the amplifier and speaker labels. Some drivers inside a cabinet may intentionally use different internal polarity as part of the crossover design; that is not something to correct at the external terminals. Leave internal wiring alone. Your job is to match the designated external positive and negative terminals across the system.
Make the system safe to inspect
Stop playback, turn the amplifier off, and follow its instructions before disconnecting cables. Avoid working behind equipment that is unstable or too tightly packed to access safely. Take a clear photograph of the current wiring and label left and right cables so you do not introduce a second problem while checking polarity.
Keep loose conductors away from neighboring terminals and metal chassis parts. A short circuit can trigger protection or damage equipment. Do not assume low listening volume makes live wiring changes safe. If the amplifier uses unusual output connectors or a proprietary connection system, consult the manual rather than treating it like a conventional pair of red and black binding posts.
Trace one conductor all the way through
Choose the marked conductor and follow it from one end of the cable to the other. It may have printed text, a colored stripe, a raised ridge, or a different visible metal finish. Connect that same conductor to positive at both ends, then use the remaining conductor for negative. Either convention works when it is consistent.
If the cable disappears into a wall or a bundle, do not guess from the nearest visible section. Check installation labels and any accessible termination plates. Where identification remains uncertain, ask a competent installer to trace the disconnected cable. Avoid connecting test devices to an amplifier output or using household wiring as a reference for speaker-cable polarity.
Inspect terminations as well as colors
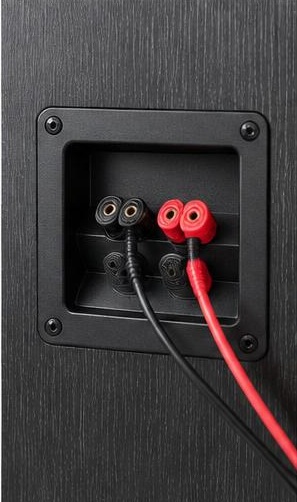
A red connector sleeve does not prove that the cable was assembled correctly. Inspect accessible ends and confirm that the same conductor reaches the intended terminal. Banana plugs, spades, and bare wire should be secure, with no stray strands. Follow the manufacturer's insertion and tightening instructions without forcing oversized connectors.
If bare wire is badly frayed, corroded, or repeatedly slipping out, replace or properly reterminate the cable with the equipment powered off. Do not leave long exposed sections that can touch adjacent posts. A neat connection prevents intermittent faults that can resemble polarity problems. Check that a terminal is clamping the conductor rather than only gripping its insulation.
Use a listening check as supporting evidence
After restoring secure wiring, play a familiar mono voice recording at a comfortable level from a central seat. The voice should normally form a reasonably stable image between the speakers. Compare several passages with shared bass information rather than relying on a single note or an unfamiliar stereo effect.
A diffuse center or weaker bass can support suspicion of a relative-polarity problem, but room asymmetry, speaker placement, and the recording itself can produce similar impressions. Do not keep swapping cables until the loudest bass wins. Confirm the labels and conductor routing first. Listening is a final sanity check, not a reliable substitute for inspecting the actual connection.
Understand why reversing both speakers is different
If both speakers are reversed together, their relative polarity remains the same. The obvious stereo cancellation associated with reversing only one speaker may therefore be absent. Whether absolute polarity is audible depends on the signal and system; it is not a reason to ignore the manufacturer's connection convention.
Use positive-to-positive and negative-to-negative as the documented baseline. This keeps the setup understandable when adding a subwoofer, changing amplifiers, or asking for service. Do not make broad claims that one entire system sounds more accurate simply because both cables were reversed. Consistency and correct documentation are more useful than chasing uncertain differences across unrelated recordings.
Check bi-wire terminals and special layouts
Some passive speakers have separate high-frequency and low-frequency terminal pairs. If you use one cable per speaker, the required factory links must be installed as the manual specifies. Missing or loose links can remove part of the sound and be mistaken for a polarity issue. Match the labels on both terminal pairs.
Do not connect two independent amplifier outputs to linked terminals. Bi-amping requires a compatible arrangement and explicit instructions; it is not achieved by casually adding another cable. In an AV receiver system, also verify that the speaker is connected to the intended channel. A correctly polarized surround cable attached to the center output is still routed incorrectly.
Document the correction and investigate remaining symptoms
Once wiring is verified, photograph both amplifier and speaker ends and add durable channel labels. Return the system to ordinary playback before making placement or equalizer changes. If bass remains uneven, investigate the room and listening position rather than repeatedly reversing connections that are already correct.
If one speaker is still substantially quieter, crackles, or loses a frequency range, stop treating polarity as the only explanation. A loose terminal link, damaged cable, amplifier fault, or speaker defect may be involved. Follow a controlled diagnostic process with power off for every cable change. Seek manufacturer support if protection indicators appear or the symptom persists after secure, correctly routed wiring.
Sources
Consult the amplifier and speaker manuals for terminal identification, supported connectors, bi-wire links, and any restrictions on output connections. Manufacturer diagrams take priority over generic color conventions.
Official support and manuals: denon.com guidance ; kef.com guidance ; svsound.com guidance